Maternal mortality rates are rising in the United States. NPR did several articles on this subject this summer. Why is it happening? What can we do about it? Most articles you read on this subject involve blaming the woman. Women are too old, too fat, too risky to be birthing babies. It's definitely our fault. Not the healthcare system that is so fragmented that every doctor has a different opinion on how to best treat the patient. Or that a lot of medicine is reactive instead of proactive. Or that once the baby is born, all attention is switched to the baby, leaving the mother almost solely responsible for voicing any concerns. At least this was my reality. I'll start at the beginning. Just as a word of warning, this is probably going to get graphic, so strap in or close the page. Don't say I didn't warn you.
I'm an only child, and always wanted to have a sibling. As L turned 2, we started to think about a sibling for him. That was always the plan, 2 kids and a dog (dog still pending). It took us a few months, but by mid-December, I was pregnant, and we were thrilled. Always the scared-thrilled of early pregnancy. After my experience with hyperemesis with L, I decided to enjoy as much of Christmas as I could before the vomiting set in. I was glad I made the most of it. By January 1, I was sick again. A familiar sick, but frustrating nonetheless. By mid-January, I could no longer keep down anything. I went to the OB who set me up with home healthcare for home IV fluids. I was placed on short term disability. About a week after starting fluids, I mentioned to the home health nurse that I was getting increasing amounts of pain in my shoulder. She told me to go to the ER immediately. Turns out I have developed a blood clot at my IV site. The IV came out and I was doing the best I could on oral liquids. The same day I was at the ER, L came down with the Norovirus. Thankfully, my mom was in town to help, but my OB told me to please keep my distance from L. I came down with Norovirus the week after. Norovirus and hyperemesis is not a good combination, and 2 days after virus onset, I couldn't walk due to weakness and dehydration. I was admitted to the hospital for 24 hours of fluid treatments and every anti-nausea drug they could give a pregnant woman to try and get my vomiting under control. And just in case anyone is wondering, no crackers and ginger ale didn't work. Nor did Zofran. The only thing that provided moderate relief was getting IV pherghan and reglan at the same time, both category C drugs. I tried to stick with Diclegis for the most part. Around 15 weeks, my OB mentioned that I should do a glucose tolerance test due to having gestational diabetes last pregnancy. There was no way my stomach could handle that, so I asked if I could monitor at home and report my numbers. Within a week, I called back saying that my numbers were not good, and I was diagnosed with GD. The good news is that my A1C came back pretty low (5.4), which I guess makes sense as I wasn't really eating much the first few months of pregnancy. I was okay with the GD. I expected it, and did my best with trying to balance the GD and the ever-present nausea. Throughout all of this, the baby was thankfully measuring perfectly. Which was a blessing. Around this time, I finally got an answer for why I got a blood clot. I had blood clotting issue (Protein C activity level deficiency). It's still somewhat unclear to me where it came from, but I will get retested in a few weeks. For the remainder of my pregnancy, I was put on Lovenox, an injection. The fun continued.
After all of these issues kind of settled, I was doing okay. Of course, I was then heading into my third trimester, which is relatively uncomfortable to begin with. I started getting a lot of anxiety. More than normal. I couldn't shake this idea that something bad was going to happen. I was terrified of labor, even though I had been through it before. I started seeing a counselor for the anxiety. I also decided I didn't want an epidural because I didn't want any other risks to labor. We hired a doula. The doula was one of the best decisions we've made. I was trying really hard to mitigate all of these fears I had. I was vigilant with my GD numbers. I didn't want to be induced. The baby dropped and my hips were killing me. But it was okay. I was okay with waiting. At my 35 week appointment, I tested GBS+. This is important. During my 38 week appointment, my blood pressure was a little high, but labs came back okay. During my 39 week appointment, my blood pressure was just plain high, and I was diagnosed with gestational hypertension. My GD numbers were also getting higher for no reason, both of which signaled to my OB that my placenta was starting to fail. She wanted to induce me. Soon. I cried. I cried and cried. I didn't want to go through labor again, and most of all, I didn't want to be induced. I wanted spontaneous labor. My OB called me again. She said it was of course my decision, but she wanted to be very clear that I was risking my baby and myself by waiting. I agreed to the induction.
On Thursday morning, Cervadil was placed. With L, that sent me into active labor within a few hours. This time... nothing. I had a few contractions and went from 1 cm to 1.5 cm. After discussing our options, we decided to try a half dose of Cytotec, which was placed at 8 pm. J and I tried to get some rest. Around 9:30 pm, I started getting regular contractions, but nothing too bad. I stayed in bed and just breathed through them. By 10-10:30, I wanted to be up. I started sitting on the birth ball, which woke up J. We decided to walk the halls a bit. The contractions were ramping up in intensity, but short. 30 seconds long at around 2-3 minute spacing. J would hold and sway me through the contraction and then we would keep walking. Around 11:15 pm, I got a pretty painful contraction and decided to call in the doula, C. C arrived around midnight. I was on the birth ball with J applying counter-pressure to my hips during contractions. The nurse also came back in around that time. She had no idea I had been in labor, so I get hooked back up to the monitors and she attempts a cervical check. This did not go super well, and I started screaming, "STOP, STOP, STOP!" at the top of my lungs. So, we had no idea on progress at that point. The monitors were also not registering my contractions. When I got up from the bed, I had lost my mucus plug and had my bloody show. From midnight to 1 am, things started getting really intense for me. My doula applied acupressure, which helped a lot, but the contractions were starting to get so painful and so close together that I was not coping well. I started feeling flu-like. I asked for the epidural. My doula suggested getting on the bed to try and relax a bit and then make a decision. J says that he was getting scared at this point because of how much pain I was in. I stood up, and my water broke. My water broke at almost the end with L, so that signaled to me that things were happening. The first contraction after my water broke was absolutely horrible. I think I just was screaming, "I can't do this! I need pain management. Please!" I also tried to bite C. C had my hand and was so encouraging. The next contraction, more fluid rushed out and I started involuntarily pushing. I looked at C and said, "I'm pushing and I can't stop myself." She very calmly looked at J and said, "we need the nurse. now." Within a few minutes (I had another pushing contraction during this), a whole team was assembled in my room. I heard someone ask, "Is she complete?" and my nurse replied, "his head is right there." I think I pushed 2 more times after this and he was born. Delivered by the hospitalist. They said it was precipitous labor. But I was in labor the whole time at the hospital. It was only surprising because the hospital was relying on cervical checks rather than looking at me. Right after he was born, I looked at the nurse and said, "I didn't get the antibiotics for GBS." The team replied, "Oh, don't worry. We will check the baby." Oh, okay. The baby checked out well. 7 pounds, 3 oz. 20.5 inches long. C hung out with us. The baby latched right away. We got to our post-partum room around 5 am and slept for a bit.
We were discharged on Sunday and started to get settled in at home. Everyone was so happy. The end of that rough pregnancy. But I really didn't feel out of the woods yet. On Tuesday afternoon, I started feeling some pain that seemed out of place, but didn't think much of it. Around midnight, I started getting lower abdominal pain. And I was cold, like getting chills. I slept for a bit between feedings. At 6 am, I got up to feed the baby. I got him fed while telling J that we needed to go to the ER. I felt really bad. I could barely walk and was shivering uncontrollably. We got to the ER, and I was crying from the pain. They whisked me back and said my vitals were consistent with sepsis. They worked quickly at this point. 2 IV lines, chest x-ray, ultrasound, catheter (ouch), labs, etc. IV antibiotics were started immediately. My fever wasn't responding to medications. My OB comes in and says this is at least a 48 hour hospital stay. Wait, what? Until that point, I didn't realize how serious things were. I started sobbing. I didn't want to be away from the kids, especially the baby. I asked for a breast pump. Over the next 4 days, the pump and I would become well-acquainted. Pumping while in pain is no fun. But I was determined to keep breastfeeding. J and my dad would end up serving as the milkman to bring my milk home, which I was told was safe for baby. I was eventually put on the telemetry unit, which is another way of saying, "good luck ever resting." It was a step down from the ICU, so basically continuous monitoring, bed alarms and people helping you in the bathroom. It was also shared rooms. My roommate was nice enough but had a lot of issues that basically kept a stream of people constantly in our room. I also found it funny that she would be casually talking on the phone and watching TV, with a "9/10" pain. Whereas, it took me a good 24 hours to get my pain manageable, so I was basically lying in bed moaning, but would report my pain as a 5 or 6, and refuse narcotics (I don't like them). Unmedicated labor is my 10/10 pain now and nothing else has even come close. Eventually my labs come back. Definitely sepsis that spread from the uterus. Looks like strep. Strep? Interesting. My blood pressure got dangerously low that night, so I was given a lot of IV fluids. The next day, they decide I'm stable enough to go to general. Yay! I actually get some rest in general, and am starting to feel better. My OB comes in and tells me that it's looking like Group Beta Strep. The thing I never got treated for in labor. "But treatment in labor is always for the baby. This is so, so rare." But it happened. And I was suffering because of it. I was missing my baby's first week. I hadn't seen L in forever. It was hard. On Friday morning, I was discharged with oral antibiotics. Before discharge, I was complaining that I was having trouble breathing and my chest felt weird. I was discharged anyway. After some calls to my cardiologist and lots of baby cuddles, we returned to the ER Friday evening. My blood pressure was now in the 150-160/90-ish range and I felt bad again. Pre-eclampsia was ruled out quickly. However, the cardiologist team wouldn't be in until the next day so I was re-admitted. Ugh. At least this time they gave me a fridge for the breastmilk. Turns out they overloaded my IV when my blood pressure was low. I was given a diuretic and peed. A lot. The echocardiogram looked good, so I was finally really discharged on Saturday.
The last week has been a blur. There has been some nipple confusion and resistance, but I think breastfeeding is back on track. I'm honestly just glad to be alive, and grateful that the GBS was sensitive to penicillin. I'm trying to make sense of it all still. I question if this had to happen, and why I seemed to get the short end of the deal this whole pregnancy. But mostly, I'm grateful to be on the other side. I'm praying that it's over. I pray every day that God will get me through this without anything else. I'm taking a bazillion vitamins and pro-biotics. And taking it very slowly. I'm praying that someday, I will be strong again. But, we named this baby, Joshua, The Lord is my Salvation. And that's what I've been hanging onto every day. I'm trying not to focus on what could have happened. And ladies, if something doesn't feel right post-partum, please seek help. By the time I got treatment, I was pretty close to going into septic shock. I think it might take me a little to get over the trauma of what happened. But for today, I am just grateful for my boys, my family, and our amazing support system who has prayed over us and taken care of things at home when I couldn't. Love you all.
Saturday, September 9, 2017
Wednesday, May 11, 2016
an update to the search
So... updates? Yes, time for some updates. Let's see here... the housing search has been going... poorly. I've been frustrated. Really and truly. Which is just another way of saying angry. I guess for some reason I thought that we would be able to find a reasonable house in our budget that wasn't in the middle of nowhere. Apparently, my expectations were too high. What I should have been looking forward to were houses that were (pick 2+): old, not updated, small, or have some sort of environmental issue (issues may include being adjacent to a highway or power lines, low flying planes, having almost no backyard, or next to other eye sores or safety hazards). So, yea... but if you are in the market for a small house without a finished basement for 3/4 of a million dollars, I can help you out! I know where to find them. Sigh. And I would say we could just stay in our current place, but that seems like a bad idea as well for a variety of reasons that I would prefer not to get into.
Anyway, in all this searching, I have managed to create a map that joined the airport overlay district information for both Loudoun and Fairfax counties (something I could not find online). The line is the LDN 60 line (which stands for loudness day and night measured in dB). It's supposed to represent the average noise generated by the planes in and out of Dulles airport. Loudoun county also has a 1 mile boundary that you can find on their website. However, even outside of this boundary, there are definitely places where the planes are quite low/loud and have scared our son quite a bit.

Anyway, in all this searching, I have managed to create a map that joined the airport overlay district information for both Loudoun and Fairfax counties (something I could not find online). The line is the LDN 60 line (which stands for loudness day and night measured in dB). It's supposed to represent the average noise generated by the planes in and out of Dulles airport. Loudoun county also has a 1 mile boundary that you can find on their website. However, even outside of this boundary, there are definitely places where the planes are quite low/loud and have scared our son quite a bit.

So, still no house. Maybe someday... I'll keep you updated.
"There is a time for everything, and a season for every activity under the heavens... a time to search and a time to give up" - Ecclesiastes 3
Thursday, March 17, 2016
New appliance
So, as we're still thinking over the house move, we've been making some updates around the house to get it a little more ready to sell. One update we decided on was updating the kitchen appliances.
This is what our kitchen looked like for a long time.


This is what our kitchen looked like for a long time.
Pretty ugly appliances, right? Anyway, here's what our kitchen looks like now (please excuse the mess and clutter). Much more updated, right? Yay!


Wednesday, March 9, 2016
Let's talk housing
My mom came and visited this weekend. It was great to have her and get a break. J and I went house shopping and got some errands done, which was nice. No update on a new house. Still waiting. And that's okay. I sometimes feel like I can be a very impatient person, so it's hard to wait and want something. But, I also feel like it teaches me lessons every time, and that there is value in waiting. Our touring agent this weekend asked us our timeline, which I replied, "Well, either before mid-summer or we wait until next year." We won't move unless it's right, which means there is no pressure. Besides our own. I've thought about making a "best of redfin" post about some of the ridiculousness I have seen on the market in our searching, but have decided I would rather write about a more serious issue, and I hope this doesn't offend too many.
This weekend, we watched, "The Big Short," which was nominated for best picture. Christian Bale was also nominated for best supporting actor (and did a really good job). I highly recommend that you watch that movie. It makes what happened during the Housing Market crash of 2007/2008 more tangible and understandable. And it leaves you angry. I have been studying the housing market since we have started thinking about moving again, so when I saw clips from the movie during the Oscars, I begged J to watch it. What got me so interested is that the prices now are so much higher than they were in 2011. During a period with relatively little economic expansion and inflation. Is what happened then, happening again? After doing a fair amount of research, I'm coming to the conclusion of, "no, but..." A couple of things have happened since the downturn in 2008. First let's take a look at the housing market index.

The red line is the one you want to to look at. Starting in the late 90s, the bubble is pretty clear. How did the first one happen? We'd like to think that the fault entirely lies with the big banks making huge profits for about 10 years, but the blame is much more spread out. The government had decided that the path to homeownership should be easier. They encouraged lending agencies to start lowering their standards from 20%+ down and fixed mortgages to 3% down (or even 0% down) adjustable rate mortgages. Eventually standards downgraded to the subprime stuff you hear about - bad credit scores, 0% down, interest only, adjustable rate, no income verification. Of course these types of loans are incredibly risky. So, to mitigate risk, they packaged all these loans into a CDO (collaterized debt obligation). The idea was that some percentage of the mortgages may default, but they won't all default and in the meantime, the interest generated was quite high. What's terrible is that these CDOs got high investment scores by the ratings agencies, placing them as safe bets in the stock market, when they weren't safe at all. That led to bonds and pensions being based off of these funds that were backed by subprime mortgages. With lower lending policies, people began to flood the market. Houses that were once not affordable became attainable. At 0% down, an individual has unlimited leveraging power. And as long as prices were going up, people thought they could easily flip a house if it didn't work out. Not only that, but people that were not real estate investors began buying property for investment purposes. Eventually, the market became saturated and the intro rates for those adjustable rate mortgages began to expire. But people were unable to refinance because the market was saturated and the prices began to fall. As this happened, more and more people defaulted on their mortgages. And it should be noted... with relatively few consequences. Defaulting on one's mortgage and being foreclosed means losing the money you put into a house. If you put down 0% or even 3%, that isn't a whole lot of loss (besides the hit to the credit score, which for many was already low). As defaults rose, the CDO market evaporated, which took down the banking sector and led to the Great Recession. So, who's at fault? The government for encouraging lax lending strategies and lowering requirements for Fannie/Freddie. For backing many mortgages that should never have been written? For bailing out the banks, who then used the money for bonuses? Absolutely. The government did a horrible, very bad thing. How about the individuals taking on loans they couldn't handle? Individuals were taking on trillions in debt on a gamble that the market would go up indefinitely. When a system is hacked, do you blame the hacker or the sysadmin who left the door unlocked and the window open? You blame both. The hacker obviously didn't do the right thing, but hackers as well as individuals usually exploit the system given to them. The lending agencies left the door unlocked, the window opened and had a sign pointing, "this way to financial ruin!" Then there were the predatory lenders, who would be like those guys from "Microsoft" asking to VPN into your computer. Yes, the government was to blame, the banks were to blame, the lenders were to blame and the individuals were to blame. And then the American people bailed out the banks. The responsible ones who saved up 20% for their house saw their investment go down the drain and were left holding the check. And no one learned their lesson. The American people were left worse for the wear and the 1%ers left richer. No one was even prosecuted. And if this doesn't make you angry, it should. It should make you sick to your stomach.
But why am I going on about this? Because prices are climbing back to 2004/2005 levels. And my question is why? Why after all that are prices not returning to their pre-1998 trend of gradual climb? One reason is that interest rates are still low. And as they remain low, the monthly payment on a 30 year fixed mortgage can be reasonable even for higher prices. Also, inventory is still low because builders haven't been building as much. Okay, fair enough, but...
http://www.nationalreview.com/article/429588/mortgage-default-and-fannie-mae
http://reason.com/archives/2015/04/01/the-next-bubble
Not to mention the national association of realtors is one of the leading lobbyists and PAC in Washington. Subprime mortgages are back! And so are CDOs. It's almost like banks and lenders didn't really learn a lesson since the American people are here to bail out big money. Remember, they're "too big to fail"! What concerned me and left me very worried was the conversation I had with the builder before we backed out of our new construction house. When I explained that it was so much money and more than we were wanting to spend, she replied, "well, I see you want to put down 20%. Why would you want to do that? That's insane! No one puts down more than 10%. I would never put down more than 10%. There are other options than a fixed rate mortgage." If I wasn't backing out before, that statement had me running for the hills.
Life in America is becoming increasingly difficult for middle America. There are few incentives for responsible decision making. And people are living with higher and higher debt to income ratios. If someone let their child run around with no consequences for their actions, we would condemn the parent. But our government, our corporations are given just that. It makes me so upset that our society is driven by this instant gratification mindset. Instead of letting the banks fail and prosecuting the scum that engaged in fraud, which would have led to better lending practices and a stronger economy eventually, we bailed them out. What lesson does that teach us? What does that teach our children? Gambling is easy when it's not your money on the line. And I can't help but think that history may very well repeat itself.
If you read all this, thanks for listening to my tirade.
If you made it to the end, here's a fun photo. Metro areas have a lot of cars. L has to tell me about each one.

This weekend, we watched, "The Big Short," which was nominated for best picture. Christian Bale was also nominated for best supporting actor (and did a really good job). I highly recommend that you watch that movie. It makes what happened during the Housing Market crash of 2007/2008 more tangible and understandable. And it leaves you angry. I have been studying the housing market since we have started thinking about moving again, so when I saw clips from the movie during the Oscars, I begged J to watch it. What got me so interested is that the prices now are so much higher than they were in 2011. During a period with relatively little economic expansion and inflation. Is what happened then, happening again? After doing a fair amount of research, I'm coming to the conclusion of, "no, but..." A couple of things have happened since the downturn in 2008. First let's take a look at the housing market index.
The red line is the one you want to to look at. Starting in the late 90s, the bubble is pretty clear. How did the first one happen? We'd like to think that the fault entirely lies with the big banks making huge profits for about 10 years, but the blame is much more spread out. The government had decided that the path to homeownership should be easier. They encouraged lending agencies to start lowering their standards from 20%+ down and fixed mortgages to 3% down (or even 0% down) adjustable rate mortgages. Eventually standards downgraded to the subprime stuff you hear about - bad credit scores, 0% down, interest only, adjustable rate, no income verification. Of course these types of loans are incredibly risky. So, to mitigate risk, they packaged all these loans into a CDO (collaterized debt obligation). The idea was that some percentage of the mortgages may default, but they won't all default and in the meantime, the interest generated was quite high. What's terrible is that these CDOs got high investment scores by the ratings agencies, placing them as safe bets in the stock market, when they weren't safe at all. That led to bonds and pensions being based off of these funds that were backed by subprime mortgages. With lower lending policies, people began to flood the market. Houses that were once not affordable became attainable. At 0% down, an individual has unlimited leveraging power. And as long as prices were going up, people thought they could easily flip a house if it didn't work out. Not only that, but people that were not real estate investors began buying property for investment purposes. Eventually, the market became saturated and the intro rates for those adjustable rate mortgages began to expire. But people were unable to refinance because the market was saturated and the prices began to fall. As this happened, more and more people defaulted on their mortgages. And it should be noted... with relatively few consequences. Defaulting on one's mortgage and being foreclosed means losing the money you put into a house. If you put down 0% or even 3%, that isn't a whole lot of loss (besides the hit to the credit score, which for many was already low). As defaults rose, the CDO market evaporated, which took down the banking sector and led to the Great Recession. So, who's at fault? The government for encouraging lax lending strategies and lowering requirements for Fannie/Freddie. For backing many mortgages that should never have been written? For bailing out the banks, who then used the money for bonuses? Absolutely. The government did a horrible, very bad thing. How about the individuals taking on loans they couldn't handle? Individuals were taking on trillions in debt on a gamble that the market would go up indefinitely. When a system is hacked, do you blame the hacker or the sysadmin who left the door unlocked and the window open? You blame both. The hacker obviously didn't do the right thing, but hackers as well as individuals usually exploit the system given to them. The lending agencies left the door unlocked, the window opened and had a sign pointing, "this way to financial ruin!" Then there were the predatory lenders, who would be like those guys from "Microsoft" asking to VPN into your computer. Yes, the government was to blame, the banks were to blame, the lenders were to blame and the individuals were to blame. And then the American people bailed out the banks. The responsible ones who saved up 20% for their house saw their investment go down the drain and were left holding the check. And no one learned their lesson. The American people were left worse for the wear and the 1%ers left richer. No one was even prosecuted. And if this doesn't make you angry, it should. It should make you sick to your stomach.
But why am I going on about this? Because prices are climbing back to 2004/2005 levels. And my question is why? Why after all that are prices not returning to their pre-1998 trend of gradual climb? One reason is that interest rates are still low. And as they remain low, the monthly payment on a 30 year fixed mortgage can be reasonable even for higher prices. Also, inventory is still low because builders haven't been building as much. Okay, fair enough, but...
http://www.nationalreview.com/article/429588/mortgage-default-and-fannie-mae
http://reason.com/archives/2015/04/01/the-next-bubble
Not to mention the national association of realtors is one of the leading lobbyists and PAC in Washington. Subprime mortgages are back! And so are CDOs. It's almost like banks and lenders didn't really learn a lesson since the American people are here to bail out big money. Remember, they're "too big to fail"! What concerned me and left me very worried was the conversation I had with the builder before we backed out of our new construction house. When I explained that it was so much money and more than we were wanting to spend, she replied, "well, I see you want to put down 20%. Why would you want to do that? That's insane! No one puts down more than 10%. I would never put down more than 10%. There are other options than a fixed rate mortgage." If I wasn't backing out before, that statement had me running for the hills.
Life in America is becoming increasingly difficult for middle America. There are few incentives for responsible decision making. And people are living with higher and higher debt to income ratios. If someone let their child run around with no consequences for their actions, we would condemn the parent. But our government, our corporations are given just that. It makes me so upset that our society is driven by this instant gratification mindset. Instead of letting the banks fail and prosecuting the scum that engaged in fraud, which would have led to better lending practices and a stronger economy eventually, we bailed them out. What lesson does that teach us? What does that teach our children? Gambling is easy when it's not your money on the line. And I can't help but think that history may very well repeat itself.
If you read all this, thanks for listening to my tirade.
If you made it to the end, here's a fun photo. Metro areas have a lot of cars. L has to tell me about each one.
Thursday, February 4, 2016
Our life updates
I haven't posted in a while. Again. I should probably stop leading my blog posts off with that since it's almost always going to be a long time between posts.
L
L is now walking. He took his first steps just after Christmas. It took him a bit to get the balance thing down and he still often prefers to hold our hand(s) while walking, but he's been walking a LOT more recently. Apparently, at daycare, he walks and babbles to the other children and is much more interactive with them. His word count is still relatively low, but he still signs a lot and his comprehension seems good. If I tell him to pick up a toy and bring it to me, he will. Or if I ask if he wants to do some activity he will crawl/walk to where that activity takes place and point. He certainly doesn't say his ABCs or count or anything like that. He seems to be much more visual and observant. He plays with Duplos quite well and can built both towers and structures. He loves cars and balls. He is quite good at puzzles to the point, I'm thinking he needs more challenging ones. Quite frankly he acts like a little engineer. (Ha) He's becoming both more interactive and more exhausting. He is constantly moving. He loves music and dancing. He is also acting much more like a toddler - screaming when he doesn't get his way, screeching in general, and fighting back against things he used to be relatively calm about. I think a lot of the true tantrums are coming from his delay in communication and not being able to tell me what he wants. Although, sometimes I definitely know what he wants, but the answer is no.


The House
Some of you on facebook are probably thinking we bought a new house. Short story: we didn't. Longer explanation: J and I had a plan that started last summer. J would buy a car, I would find a new job, and then we would get a new house this spring. The first 2 have already happened, so we're working on the third one. We want to move for a couple of reasons. One is we feel we are outgrowing the townhouse. L's room is pretty small and there is just a lot of stuff. Now, we could get rid of some of the stuff and try to make it work, but there's a few things that piss me off and just probably wouldn't change. And we really can't make our rooms larger. We also would like to have a garage. We have parking spaces, but it's getting old. Plus parking in our community is just a problem and will likely continue to be a problem. We are also close to an area where a lot of college students live. There is always noise, always someone honking their horn, having a party, shooting off fireworks. I think we are both just kind of tired of the whole situation and ready to move on. So, we started looking early in January. The problem of course is that inventory is low in January. Spring is when real estate starts moving so we were early to be looking. Our approach was to visit different areas and figure out which neighborhoods we would focus on. This worked out well during our last search because we had very little pressure to buy anything, but were able to get the everything in place so we could move quickly. Since not a lot was on the market, we visited a lot of new construction places to see what was out there. Most were above our price range so it was more for fun than anything. One place we visited on a whim was in our price range and had a gorgeous model home. We went through the process as far as making a deposit. But we had a 3 day contingency to back out. Enter 3 very stressful days. Once we added in everything we wanted into the house, the price was outside of what we said we were going to spend. It was close, but the reality of how much we would be cleaning out our savings really started to hit home. I also starting thinking about how new houses don't have a porch/deck, have to be painted (inside), and the lawn takes a lot of maintenance the first year. With the house at the top of our budget, I was worried. When I voiced my concerns to J, he was worried as well. We were up half the night discussing it, and we were both so on the fence, we decided to pull out. When we bought our current place we were 100% all in. This just wasn't the same. I still think it was the right decision. I'm seeing comparable houses in the same area for less money on the market. I think we would have overpaid. But it was a pretty house.
So, we are back to searching, but with a little more trepidation and a lower top price. We have also started to make some small improvements to our place (like new appliances) in order to prep for selling. We are using Redfin to search for places and I am loving the experience - low pressure, lower costs, but also knowledgeable agents. There is no hand holding, so I would say you have to be your own advocate a little more, but if you are willing to do the upfront work. it's great!
The Housing Market 2016
There's a couple of interesting differences between house searching in 2011 and now. In 2011, there was so much built up demand for houses due to the recession/housing market burst that decent houses sold quickly. Our house went on the market on a Friday, we saw it that day and had an offer in that night. By Sunday, they had 5 additional offers and we had to deal with a bidding war. And that wasn't an unusual situation. Now, it's a little different. Nice houses seemed to be overpriced (this is my opinion, but most list prices seem ridiculous to me). I think this is largely due to low interest rates pushing up sale prices as people can afford more house with a lower rate.
Another interesting difference is that houses are sitting on the market longer than in 2011. To me, that means demand is lower, which could put us in a good position to bargin with sellers to get a good price. Although, we may also have a harder time selling as well.
I found the following websites to be interesting (don't know how I got into the rabbit hole of housing market trends).
http://www.jparsons.net/housingbubble/
http://www.economist.com/blogs/graphicdetail/2015/11/daily-chart-0
The uptick since 2012 has been concerning to me since it seems like housing prices are growing much faster than inflation and certainly more than people's salaries. I think as long as we are in the house long enough that shouldn't affect us too much.
So, we'll see. But, no we aren't buying a house. At least not yet.
L
L is now walking. He took his first steps just after Christmas. It took him a bit to get the balance thing down and he still often prefers to hold our hand(s) while walking, but he's been walking a LOT more recently. Apparently, at daycare, he walks and babbles to the other children and is much more interactive with them. His word count is still relatively low, but he still signs a lot and his comprehension seems good. If I tell him to pick up a toy and bring it to me, he will. Or if I ask if he wants to do some activity he will crawl/walk to where that activity takes place and point. He certainly doesn't say his ABCs or count or anything like that. He seems to be much more visual and observant. He plays with Duplos quite well and can built both towers and structures. He loves cars and balls. He is quite good at puzzles to the point, I'm thinking he needs more challenging ones. Quite frankly he acts like a little engineer. (Ha) He's becoming both more interactive and more exhausting. He is constantly moving. He loves music and dancing. He is also acting much more like a toddler - screaming when he doesn't get his way, screeching in general, and fighting back against things he used to be relatively calm about. I think a lot of the true tantrums are coming from his delay in communication and not being able to tell me what he wants. Although, sometimes I definitely know what he wants, but the answer is no.


Some of you on facebook are probably thinking we bought a new house. Short story: we didn't. Longer explanation: J and I had a plan that started last summer. J would buy a car, I would find a new job, and then we would get a new house this spring. The first 2 have already happened, so we're working on the third one. We want to move for a couple of reasons. One is we feel we are outgrowing the townhouse. L's room is pretty small and there is just a lot of stuff. Now, we could get rid of some of the stuff and try to make it work, but there's a few things that piss me off and just probably wouldn't change. And we really can't make our rooms larger. We also would like to have a garage. We have parking spaces, but it's getting old. Plus parking in our community is just a problem and will likely continue to be a problem. We are also close to an area where a lot of college students live. There is always noise, always someone honking their horn, having a party, shooting off fireworks. I think we are both just kind of tired of the whole situation and ready to move on. So, we started looking early in January. The problem of course is that inventory is low in January. Spring is when real estate starts moving so we were early to be looking. Our approach was to visit different areas and figure out which neighborhoods we would focus on. This worked out well during our last search because we had very little pressure to buy anything, but were able to get the everything in place so we could move quickly. Since not a lot was on the market, we visited a lot of new construction places to see what was out there. Most were above our price range so it was more for fun than anything. One place we visited on a whim was in our price range and had a gorgeous model home. We went through the process as far as making a deposit. But we had a 3 day contingency to back out. Enter 3 very stressful days. Once we added in everything we wanted into the house, the price was outside of what we said we were going to spend. It was close, but the reality of how much we would be cleaning out our savings really started to hit home. I also starting thinking about how new houses don't have a porch/deck, have to be painted (inside), and the lawn takes a lot of maintenance the first year. With the house at the top of our budget, I was worried. When I voiced my concerns to J, he was worried as well. We were up half the night discussing it, and we were both so on the fence, we decided to pull out. When we bought our current place we were 100% all in. This just wasn't the same. I still think it was the right decision. I'm seeing comparable houses in the same area for less money on the market. I think we would have overpaid. But it was a pretty house.
So, we are back to searching, but with a little more trepidation and a lower top price. We have also started to make some small improvements to our place (like new appliances) in order to prep for selling. We are using Redfin to search for places and I am loving the experience - low pressure, lower costs, but also knowledgeable agents. There is no hand holding, so I would say you have to be your own advocate a little more, but if you are willing to do the upfront work. it's great!
The Housing Market 2016
There's a couple of interesting differences between house searching in 2011 and now. In 2011, there was so much built up demand for houses due to the recession/housing market burst that decent houses sold quickly. Our house went on the market on a Friday, we saw it that day and had an offer in that night. By Sunday, they had 5 additional offers and we had to deal with a bidding war. And that wasn't an unusual situation. Now, it's a little different. Nice houses seemed to be overpriced (this is my opinion, but most list prices seem ridiculous to me). I think this is largely due to low interest rates pushing up sale prices as people can afford more house with a lower rate.
Another interesting difference is that houses are sitting on the market longer than in 2011. To me, that means demand is lower, which could put us in a good position to bargin with sellers to get a good price. Although, we may also have a harder time selling as well.
I found the following websites to be interesting (don't know how I got into the rabbit hole of housing market trends).
http://www.jparsons.net/housingbubble/
http://www.economist.com/blogs/graphicdetail/2015/11/daily-chart-0
The uptick since 2012 has been concerning to me since it seems like housing prices are growing much faster than inflation and certainly more than people's salaries. I think as long as we are in the house long enough that shouldn't affect us too much.
So, we'll see. But, no we aren't buying a house. At least not yet.
Thursday, November 19, 2015
15 months
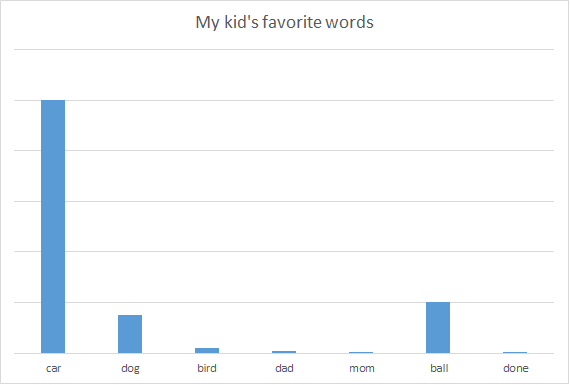
So... it's been a while since I've blogged, so I thought I would share some updates. It's been 3 whole months since I've sat down and done this. I think that officially makes this my longest dry spell with blogging. Life has been busy since August. L has gone from a baby to an emerging toddler. I feel like there should be a name for this in-between stage. I have, for a long time, felt like the 1-2 year transition is a little awkward - not quite baby, not quite toddler, aspects of both. Ah well. L has gotten significantly longer. I don't know his actual stats because we haven't done our 15 month check quite yet, but he's definitely losing the baby rolls. What's so funny about this is that clothes that were too small for him last spring (ie pants that didn't fit over his chunky thighs) now fit perfectly! I had this impression that he would continue to fly through the sizes but he has been in 12-18 months since last March. The pants are just now getting a little short in that size. L continues to be a crawling and cruising machine. His cruising game has recently been showing some pretty advanced moves like letting go for a few seconds and transferring really well around and between pieces of furniture. I still think walking may be a little ways off, but possibly by Christmas? I do think he'll be walking before 18 months (which is really the cutoff for physical therapy to ramp back up). But, he'll only do it when he's ready. He said his first word last month - "Dog!" It should be noted we don't actually have a dog, but we do have a lot of stuffed dogs. I was excited to hear him talk. We have also been teaching him signing and he can sign - "eat", "all done", "thank you", "baby", "bye bye", and "more". Since I figured he would be a slightly late talker, the signs have been really helpful for being able to communicate with him. I highly recommend. He continues to point to show things that are interesting. He gained a few more teeth, bringing our count up to 13. He has one eye tooth, but I expect the other ones will come in soon. He takes either 1 or 2 naps a day. He usually only sleeps once at daycare, but usually gets tired mid morning at home, so we give him 2 naps at home. So he typically gets 4 days of 1 nap and 3 days of 2. I was kind of stressing about this, but it usually goes better if I just follow his cues for when he's sleepy during the day. I think daycare is just too exciting to sleep more than once. Oh - speaking of which! We found a daycare and L has been attending since September. It's an in home place with one provider and 1-2 helpers. We like it and L has definitely adjusted well to it. I think I would like a more structured setting when he gets a little older, but it is good for now. L's immunity is working hard. I think he's been sick with one thing or another since September and pretty much always has a runny nose and a cough. I have brought him to the pediatrician who mostly shrugged and said, "yea, he's in daycare." Oh well.
In other news, we bought a car in early September. It's J's new car, and he really likes it. It's a Jeep, so we have a lot more space than my sedan, which is nice for trips. Last month, I started a new job, myself. It has been good so far, but still the early days. I am still working part time, but work 4 days instead of 3. It's been an adjustment, but I think going pretty well. I do love my new commute and my office is right on a pond, which is way prettier than my last workplace. :) I have been quilting and recently taught myself to crochet. It's been fun to learn and make some new things.
I think that's most of the main updates.
Since a picture is worth a thousand words... here are some pictures from the last 3 months...


September wedding


We went to Cox farms. I had a great time. Luke... not so sure.


Look at those long legs!


J and I spent our anniversary in Charlottesville


Current quilting project. All the small squares take forever.


Crochet project - Christmas hat.

Crochet project - Dog hat

Fall pictures I did with L:


Happy Thanksgiving!
Sunday, August 30, 2015
1 year!
Guess who's 1?? That's right -- we have officially survived the first year of parenting! I'll admit L's birthday this year was significantly less painful than last years!
L's current stats:
Weight: 24 lbs 11 ounces
Height: 32.5 inches
Teeth: 10 (halfway there on the baby teeth)
When he was born, he was 7 lbs 9 ounces and 20.75 inches long. That means he has more than tripled his birth weight and gotten a lot taller! He has met his milestones, which led our pediatrician to recommend stopping physical therapy. L now not only crawls a lot, but stands and cruises as well. He will likely still be a later walker due to his late crawling, but that's okay. No words yet, but that's not all that surprising. Lots of babbling, though! We have officially baby-proofed all the things, yet somehow L still finds ways to hurt himself (losing his balance, pulling stuff on top of himself, etc). I feel like some of this is good (as long as it isn't actually dangerous). The growth in defiance and doing things he knows he isn't supposed to do has grown in the past month. I'm realizing more and more that he is transitioning from baby to toddler (excuse me while I go cry). Our doctor said we could stop the formula and switch to cow's milk! (Do you even know how much cheaper cow's milk is than formula?? I'll give you a hint -- a lot!). We are working on the transition. We started a week ago, so I am offering milk and water in sippy cups throughout the day. He didn't drink a lot the first few days, but he seems to be getting the hang of it. He also seems to be understanding how to drink out of a straw cup, so that's pretty cool as well. I'm still doing one bottle before bed as he gets the hang of it, but I'll probably be dropping that in the next month. He is such a good eater, but is starting to become a little more picky (noooo!!).
Our biggest change is coming up. We found out a few weeks ago that our nanny is not coming back from maternity leave (so sad). So... we had a frantic couple of weeks figuring out a new child care situation. Unless you have been through it, it's hard to realize just how difficult finding good child care can be. I went to 6 in home daycares (the center daycares were all full) and interviewed several nannies. In the end, I really felt like L was at the age where I want him to start socializing with other kiddos and I think he would benefit from a daycare setting. I went to several in home places where I was literally backing out as I was saying hello. (yikes!) Others were okay, but I didn't feel all that comfortable. We are going to try out one close to our house that I felt pretty comfortable with. Truthfully, I am really, really nervous about it. I don't know how he's going to do, but I'm just going to go with it and trust that God will protect him. I feel like it's the decision we were pushed into making, so I just pray it's the right one. He starts tomorrow! He's also sort of transitioning to 1 nap a day instead of 2, so I think the daycare setting will help him with that transition since all the other kiddos will be napping at the same time. (We shall see).
In the past month, we have gone to Atlanta for a wedding and hosted a birthday bash for L. Lots of good times were had by all. I also made a busy board for L's first birthday.
Trip to the zoo. L was pretty hot and miserable the whole time.


One picture for each month


L's current stats:
Weight: 24 lbs 11 ounces
Height: 32.5 inches
Teeth: 10 (halfway there on the baby teeth)
When he was born, he was 7 lbs 9 ounces and 20.75 inches long. That means he has more than tripled his birth weight and gotten a lot taller! He has met his milestones, which led our pediatrician to recommend stopping physical therapy. L now not only crawls a lot, but stands and cruises as well. He will likely still be a later walker due to his late crawling, but that's okay. No words yet, but that's not all that surprising. Lots of babbling, though! We have officially baby-proofed all the things, yet somehow L still finds ways to hurt himself (losing his balance, pulling stuff on top of himself, etc). I feel like some of this is good (as long as it isn't actually dangerous). The growth in defiance and doing things he knows he isn't supposed to do has grown in the past month. I'm realizing more and more that he is transitioning from baby to toddler (excuse me while I go cry). Our doctor said we could stop the formula and switch to cow's milk! (Do you even know how much cheaper cow's milk is than formula?? I'll give you a hint -- a lot!). We are working on the transition. We started a week ago, so I am offering milk and water in sippy cups throughout the day. He didn't drink a lot the first few days, but he seems to be getting the hang of it. He also seems to be understanding how to drink out of a straw cup, so that's pretty cool as well. I'm still doing one bottle before bed as he gets the hang of it, but I'll probably be dropping that in the next month. He is such a good eater, but is starting to become a little more picky (noooo!!).
Our biggest change is coming up. We found out a few weeks ago that our nanny is not coming back from maternity leave (so sad). So... we had a frantic couple of weeks figuring out a new child care situation. Unless you have been through it, it's hard to realize just how difficult finding good child care can be. I went to 6 in home daycares (the center daycares were all full) and interviewed several nannies. In the end, I really felt like L was at the age where I want him to start socializing with other kiddos and I think he would benefit from a daycare setting. I went to several in home places where I was literally backing out as I was saying hello. (yikes!) Others were okay, but I didn't feel all that comfortable. We are going to try out one close to our house that I felt pretty comfortable with. Truthfully, I am really, really nervous about it. I don't know how he's going to do, but I'm just going to go with it and trust that God will protect him. I feel like it's the decision we were pushed into making, so I just pray it's the right one. He starts tomorrow! He's also sort of transitioning to 1 nap a day instead of 2, so I think the daycare setting will help him with that transition since all the other kiddos will be napping at the same time. (We shall see).
In the past month, we have gone to Atlanta for a wedding and hosted a birthday bash for L. Lots of good times were had by all. I also made a busy board for L's first birthday.
Trip to the zoo. L was pretty hot and miserable the whole time.
Wearing the new Georgia Tech shirt we got him from Atlanta
We got a bunch of balls for his birthday so I put them in an inflatable pool for indoor fun.
Food for L's birthday. It was storybook themed. :)
One picture for each month
Cake smash
The busy board I made him. I already had the board from a previous project, so I just bought the other items on the board from Home Depot and screwed them in! Pretty easy project for a toddler. :) I think he likes the switch at the door stop the best.

Subscribe to:
Posts (Atom)